
40K Series - Necron Warrior

Necrons are quite an unusual faction in the 40K Universe. Looking not too dissimilar from a T1000 terminator, they carry really powerful Gauss weaponry that can turn any Imperial defence line into ashes with ease.
Possibly the most straight forward models to paint our of the whole genre, however speed painting them to create an army easily takes a bit of time.
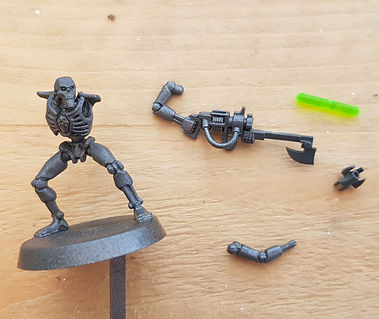
This is the Necron Warrior kit I will be using for this tutorial. Before we start with the guide though, there are a couple of points to detail below, which are important to take into account for painting this figure - detailed guides can be found in the 'Painting Guides' tab at the top.
Things like - Basing - Drybrushing - Detailing - Washing - Weathering
If you're unfamiliar with any of these painting techniques, or you are and you think that you could do with a refresher, please follow the links above, or where they're inbeded in the body of the text.

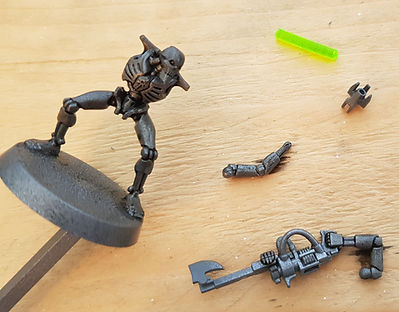
Model parts laid out and cleaned up
Stage 1 - Assembly
As with previous guides, as important as the paint job itself is the preparation of the model and the assembly.
Most plastic models are made from injecting hot liquid plastic into a 2-sided mould... so you'll have mould lines. Resin has flashing, which is a similar thing. This all needs to be removed before you paint - because if you don't - it will come out in the detailing and it will look rubbish.
Now the Necron kit is very fiddly to put together. I found that using plastic cement glue didn't hold the small areas of contact on the models strongly enough. So I used Gale Force 9 Super Glue. After a couple of seconds of contact, it isn't going anywhere. Superglue is also good for the green translucent part which will fog if you use polycement.
Assemble the body, legs and head, minus the arm holding the weapon and supporting arm. Paint them all individually.
Stage 2 - Priming / Base Coat
Priming models is the key to making your paint stick to your models, and stay stuck to your models. To get a good clean finish all over - Use an airbrush or a rattle-can primer.
For the Necron models I used Army Painter Gun Metal spray paint - As the plastic is grey to start with, only a couple of light dusting coats is required.
With spraying anything, hold the can 4 inches away from the model and dust in the model in light thin coats - Too much and the paint will pool in the detail and make it so that the detail isn't as pronounced - which spoils the model.
I glued a long spare spray frame to the underside of the base so that I could spray without getting it all over my hand. Ensure to spray in a well ventilated area where possible. Allow to fully dry before moving on. In this time, you may want to do the others if batch painting.
Army Painter Gunmetal is sprayed over every part
Nuln Oil wash being applied all over
Stage 3 - Washing
Now comes the messy/fun bit! Washing the model is a great way of making all of the sunken detail (panel lines, mouths, eye sockets etc) sink back into the model and create the illusion of ambient occlusion.
Giving it a good shake before hand, I used GW's Citadel Nuln Oil to un-surreptitiously wash all over the model, from head to toe.
Be sure to cover all of the model; however be careful that the wash doesn't pool on any of the open panel surfaces - use your brush to keep working the wash gently into the recesses, but don't remove the wash completely from the flat metal areas.
Don't forget to wash the arm holding the gun as well as the hand and supporting arm on the other side.
Give it a long time to fully dry.
Necron compound drybrushing highlights
Stage 4 - Drybrushing #1
Drybrushing is an easy way of creating highlights on a model, without needing the skill/time necessary to do what the pro-painters do - and layer up several different shades of highlights over the top of one another.
That being said, there's a bit of an art associated with drybrushing, and all it needs is a bit of planning.
Consideration #1 - Where is the light coming from? Is it a sun which is illuminating your model, or is it lighting on the ground which is glowing on your model. This will affect the drybrushing direction.
Consideration #2 - Strength of the light - Is the sun a distant glow, or is the model in a binary star system which pumps out volumes of light. This will affect the pressure on which you brush the paint on the model.

In this model's instance, it is being lit from a local star in the system where the Warrior is fighting. So we'll be putting gentle pressure, but making sure quite a lot of the open areas (like the dome of the head, and the thighs, forarms and upper arms) get hit with that drybrush.
The drybrushing will be applied to the model with medium pressure. I used Citadel's Necron Compound on this for the first Stage of drybrushing.
You'll notice that I painted the main body of the weapon in Citadel's Abaddon Black.

Moot Greet and Coelia Greenshade being applied
Stage 5 - Detailing
Now that your warrior is looking like the metallic chrome automaton it should be, it's time to add the finishing touches.
Detailing on the Necron warriors comes in the way of highlighted colours on the breastplate, and coils/pipes on the weapon.
These are going to be painted in Citadel's Moot Green and then washed in Citadel's Coelia Greenshade.
Now that the model is mostly painted, I assembled the rest of the model, including the translucent green rod in the weapon using the GF9 Super Glue.
Now all you need to do is base the model, and then they're good to play with.
So there you have it, the completed mini - Now onto the rest.